
Home > Service > Class support > Scomb > Issue a task
Issue a task
Updated 2020/11/11
You can give assignments to students and have them submit reports.
You can also set the Assignment Period, check the submission status, give feedback, and more.
* Students can submit files of up to 50 MB each.
| Target persons | Faculties |
| Purpose | Students will be presented with an assignment on Scomb and asked to submit it. |
Creating Assignments
Once the Assignment Period starts, a link to the assignment submission screen will be displayed in the students' Subject TOP screen. (If a past date/time has been set, it will take up to 1 minute for the link to appear in the screen.)
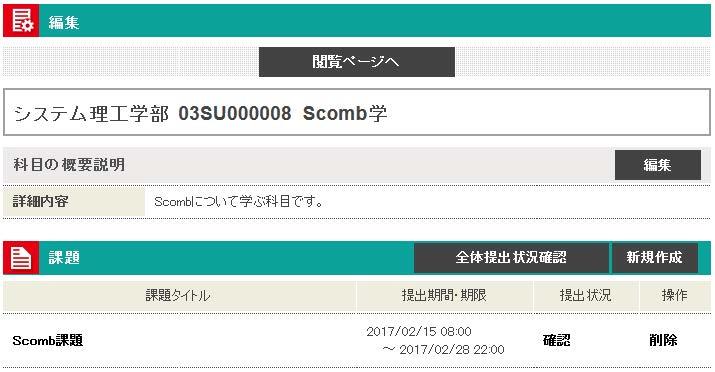
Click the [New] button for Assignments in the Edit Subject TOP screen to go to the Create New Assignment
screen.
![[新規作成]ボタン](http://web.sic.shibaura-it.ac.jp/wysiwyg/image/download/55/4312/big "[新規作成]ボタン")

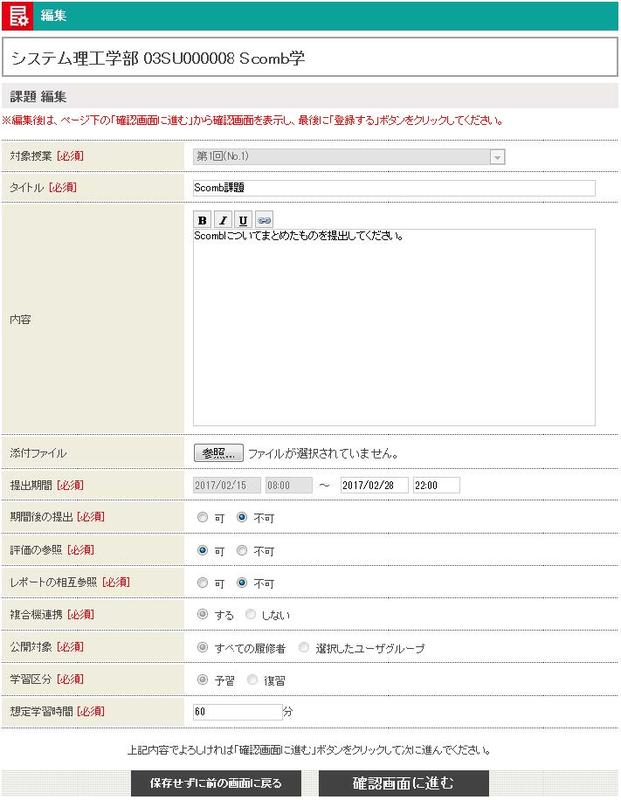
| ① | Lecture |
Select the lecture for which the assignment is submitted to from the pull-down * For lecture registration, see "Class Contents & Materials" in this manual. |
||||||||||||
| ② | Title | Enter the title of the assignment. (255 characters or less.) | ||||||||||||
| ③ | Contents | Enter the description of the assignment. (1300 characters or less.) | ||||||||||||
| ④ | Attachment | You can upload files of up to 50 MB each. | ||||||||||||
| ⑤ | Assignment Period |
You can set the submission period. The period can be changed even after it has
|
||||||||||||
| ⑥ | Deadline | Set whether or not to accept submissions after the deadline. | ||||||||||||
| ⑦ | Viewing Scores | Set whether or not to allow students to view evaluations of their reports. | ||||||||||||
| ⑧ | Cross-reference | Set whether or not to allow students working on the same assignment to view each other's submitted reports. | ||||||||||||
| ⑨ |
MultiFunction integration |
Set whether or not to allow MultiFunction integration. Assignments with MultiFunction integration set to "Yes" will be displayed on MultiFunction during the Assignment Period and can be associated with predefined forms.
* For MultiFunction integration of assignments, see " MultiFunction Integration:Assignments" in this manual. This feature is currently unavailable. |
||||||||||||
| ➉ | Publish to |
Set who can view the assignment ("All enrolled students" or "Selected user group"). When you select "Selected user group," a user group list will be displayed. |
||||||||||||
| ⑪ | Study category |
Select whether the time spent for the assignment will be added to "Preparation" or "Review." The setting cannot be changed once the Assignment Period starts. |
||||||||||||
| ⑫ | Estimated study time |
Enter the estimated time required to complete the assignment. |
||||||||||||
| ⑬ | Markup Functions |
You can use the markup functions. |
Fill in the necessary items and click the [Confirm] button. The Confirm Assignment screen will be displayed.

- You can preview the report submission screen.
Click the [Preview] button in the Confirm Assignment screen to display the following screen.

After entry, click the [Confirm] button to go to the confirmation screen.
Check the details and click the [Submit] button.
Submission will be completed with a completion message.
* When the Assignment Period starts, the assignment will be displayed in the students' Subject TOP screen.
For 3 days after the Assignment Period starts, NEW will be displayed with the assignment title
Editing Assignments
Click the title of a created assignment to go to the Edit Assignment screen.
Edit the contents and click the [Confirm] button to go to the confirmation screen.
Check the details and click the [Submit] button.
Submission will be completed with a completion message.
Deleting Assignments
You can delete created assignments.

Click the [Delete] link of the assignment you want to delete to display a confirmation dialog.
Click the [Delete] button in the confirmation dialog to delete the assignment.
* The assignment cannot be deleted if a student has already submitted a report.
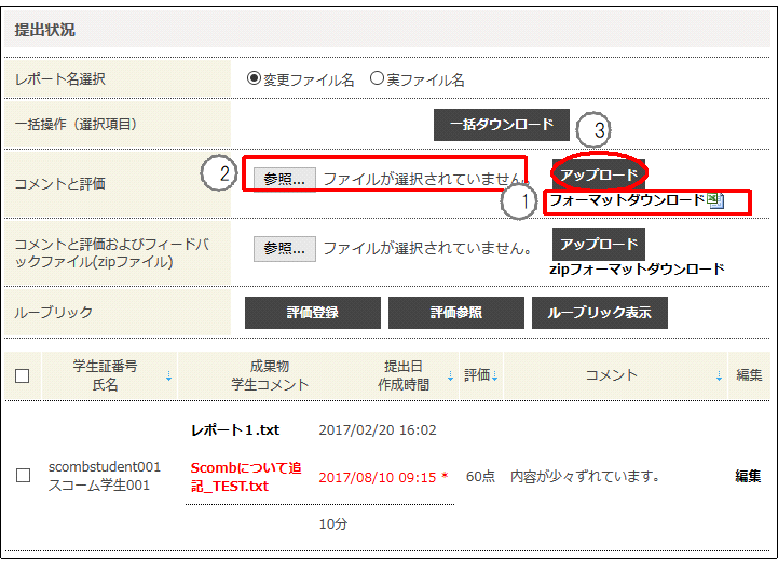
Checking Submission Status
You can check the submission status of created assignments.
Click the [Check] link of the assignment you want to check in the Edit Subject TOP screen to go to the Check Assignment Status screen.

In the Check Assignment Status screen, you can check the list of enrolled students and the submitted reports.
You can also download submitted files and submission status at once, or upload comments, evaluations, and feedback files at once.
Students can check the contents immediately after they are uploaded.
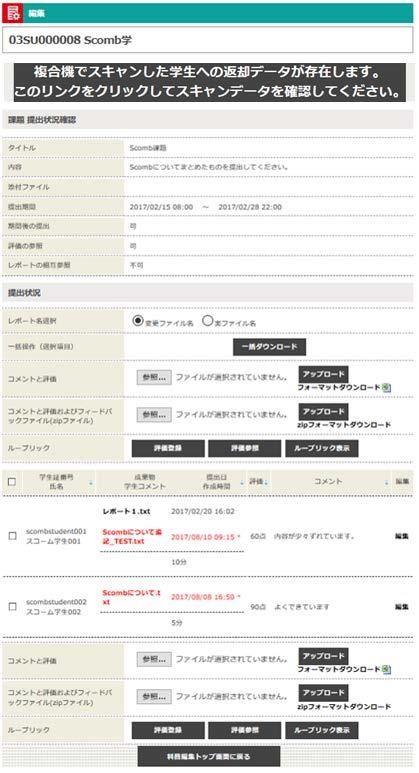
| ① [There is return data for students scanned by the MFP] | Click the link to display the list. |
|
② Download Selected Assignments |
You can download the assignments submitted by the selected
* For details, see "Downloading Reports at Once" in this manual. |
| ③ Upload Comments and Score | Upload comments for students at once (up to 50 MB). |
| ④ Upload Comments, Score and Feedback |
Register your evaluations of students, with comments and feedback, at once. |
| ⑤ Rubric |
You can register evaluations, view the evaluations, or display the rubric. |
| ⑥ Submission status list | You can check the report submission status of users who have been assigned with the report. Users who have not submitted the report will be displayed with a red background. |
| ⑦ Report |
Click the file name of the submitted report to download the report. a. When the creation time exceeds the estimated creation time b. When the creation time is less than half the estimated creation time c. When the report was submitted after the deadline
* To set the estimated study time and submission period of reports, see "Assignments: Creating Assignments" in this manual. |
| ⑧ Edit | Click the [Edit] link to go to the Register Feedback Comment screen. |
Downloading Reports at Once
You can download the assignments submitted by the selected students at once.
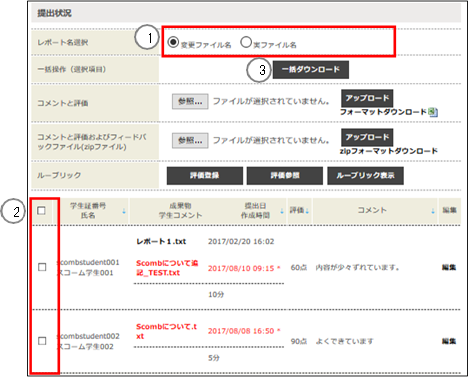
① Select whether to download submitted files with the display file name or the actual file name.
② Select the check boxes of the users whose assignments you want to download.
③ Click the [Download] button to download the assignments submitted by the selected users at once.
When you decompress the downloaded zip file, the result will be in the following structure.

For users who have submitted their reports, the reports are stored in the folders named by their User IDs.
Each student's submission information is listed in "assignment_comment_format.xlsx."
* For reports of temporarily enrolled users, see "Checking Submission Status" in this manual.
The "assignment_comment_format.xlsx" file

Each student's assignment submission status and the faculty member's evaluations/feedback information are
displayed.
Downloading and Uploading the Format
You can register your evaluations of students, with comments, at once.
① Click the [Download Format] link to download the format (.xlsx).

| a.Evaluation | You can enter numbers or text such as A, B, and C for the evaluation. (255 characters or less.) |
| b.Comment | You can enter your comments. (1300 characters or less.) |
| c.File Name |
If a feedback file has already been uploaded, you can change the file name. |
② Click the [参照] (Browse) button to select the completed format.
③ Click the [Upload] button to upload the entered comments and evaluations at once.
* The registered evaluations and comments can only be viewed by the students themselves.
* If there is an input error, correct the error and upload the file again until all data in the upload file is loaded.
Downloading and Uploading the Zip Format
You can register your evaluations of students, with comments, at once. You can also register feedback files at the same time
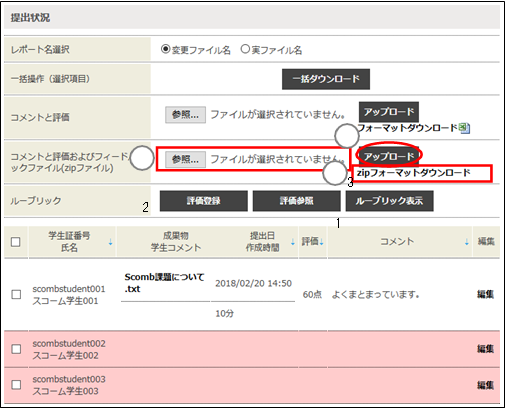
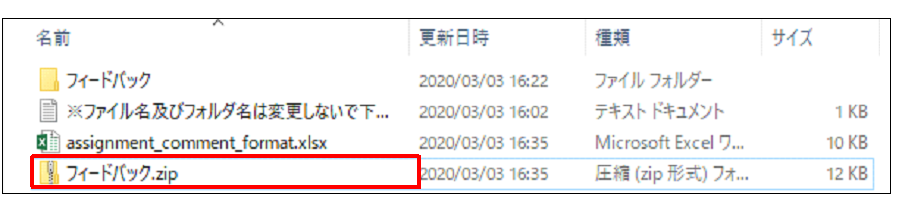
① Click [Download Zip Format] to download the format, and then decompress the zip file.
The red-framed "assignment_comment_and_feedback_format" folder is the decompressed folder.

<Contents of the "assignment_comment_and_feedback_format" folder>

Store the files you want to upload in the FeedBack folder, and enter your evaluations, comments, and file names
(names of files stored in the FeedBack folder) in the "assignment_comment_format.xlsx" file.
Compress the entire red-framed folder and files back to a zip file.

* If you compress the red-framed folder that you decompressed in ①, the file structure will be different and the file cannot be uploaded.
* For details on the "assignment_comment_format.xlsx" file, see "Downloading and Uploading the Format" in this manual.
② Click the [参照] (Browse) button to select the created zip file.
* Do not change the file name of the downloaded format.
③ Click the [Upload] button to upload the entered comments, evaluations, and feedback files at once.
* The registered evaluations and comments can only be viewed by the students themselves.
* If there is an input error, none of the data in the upload file will be loaded; correct the error and upload the file again.
* You can upload one file for each student. To upload multiple files, compress the files to a single zip file.
* If you still cannot upload the file even after correcting the input error, the file structure may be different. Decompress the zip file you want to upload, and then check that the file structure is organized as follows. If the file structure is different, correct the structure and upload the file again.
<zip file>

<Contents of the folder generated by decompressing the above zip file>

<Contents of the FeedBack folder> (If you have any files you want to upload, store them here)

Registering Feedback Comments
In the Register Feedback Comment screen, you can register the evaluation of the assignment, feedback comment, and feedback file for each student. Students can check the contents immediately after they are registered.
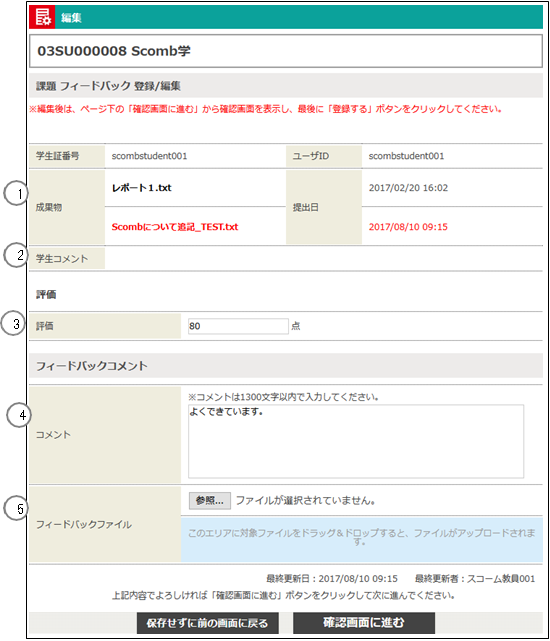
| ① Reports | You can download the reports submitted by the student. |
|
② Students comment |
A comment registered by the student when submitting the work will be displayed. |
| ③ Score | You can evaluate the reports submitted by the student. (255 characters or less.) |
| ④ Comments | You can enter feedback comments. (1300 characters or less.) |
| ⑤ File | You can upload a feedback file. (Up to 50 MB each.) |