
Home > Service > Information security > Anti-Virus Software > Sophos Anti-Virus > Sophos Anti-Virus installation(MacOS)
Sophos Anti-Virus installation(MacOS)
Updated 2021/04/23
|
The anti-virus software Sophos macOS 11 (Big Sur) cannot be updated because it is waiting for the manufacturer to support it. Please wait for a while to install Sophos on macOS 11.
August 2021 Confirmed that the pattern file can be updated (MacOS11.4). |
Preparation
Download Instllation package
1.First, click the link below to download the SAV package to any location (desktop, ect.).
2.If you download the above from off-campas (via the Internet), you will be asked to authenticate yourself (skip if you download on-campus).
To install or update to an off-campus system, you need to apply for "Sophos home use" (= register SAV update password) at AMI 

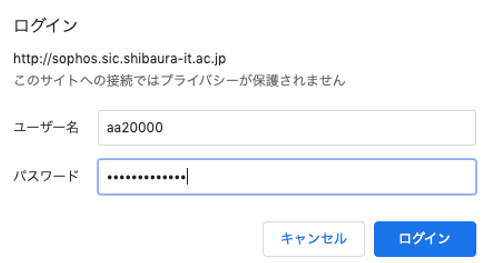
- Username : Enter your academic information ID.
- Password : Enter the SAV update password set in advance on the AMI.
- Execute [Login]
Delete the antivirus software (other than SAV) currently in use
If multiple antivirus software are mixed in the system, unexpected problems may occur.
If you already have other antivirus software in your system, delete it at this time (see each manual for how to delete it).
Delete old version SAV
If the installation or update fails on the system on which SAV is installed, or if you want to perform a clean installation, please refer to the following and delete it.
Normal uninstall method:
Some files are not deleted by the steps up to this point. Please refer to the explanation of the link below and delete it.
How to uninstall when uninstalling cannot be performed normally:
Installation
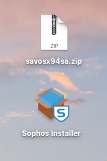
1.Double-click the downloaded ZIP file.
2.The "Sophos Installer" will be unzipped on your desktop. Double-click on this .
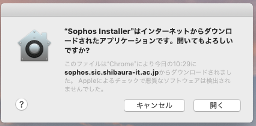
3.At this time, if the following warning message appears, select [Open].
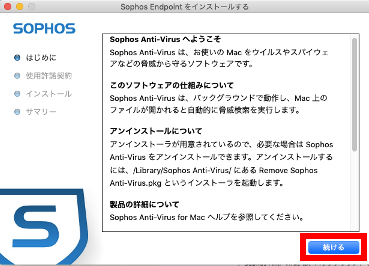
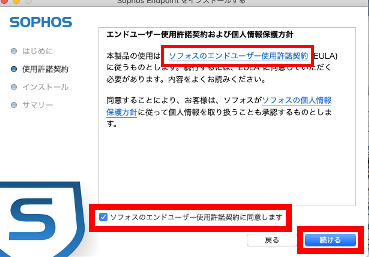
4.Check the contents of "Introduction" and press [Continue].
5.Check the "Sophos End User License Agreement", check "I accept the Sophos End User License Agreement", and click [Continue].
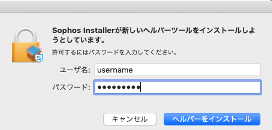
6.Enter the user name and password for that computer, and press [Install Helper].
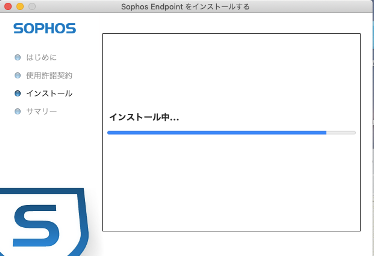
7.Wait for a while until the installation is completed.
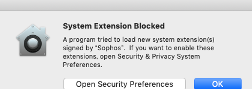
8.When the "System Extension Blocked" pop-up appears, click [OK].
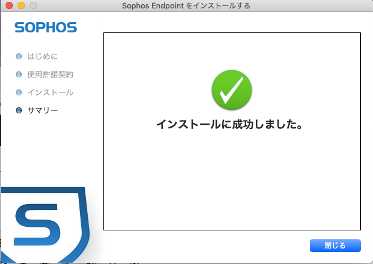
9.If the installation is successful, press [Close] to finish.
Post-installation settings
Settings after installation (※It is dangerous to use with the initial settings.)
The following settings are illustrated (customize to your environment if necessary).
・On-access search settings
・Automatic update settings
・Local volume search settings
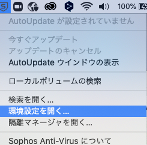
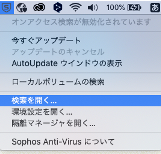
Launch Sophos Anti-Virus
・Click the shield icon in the menu bar of your desktop screen.

1.Select "Open Preferences"
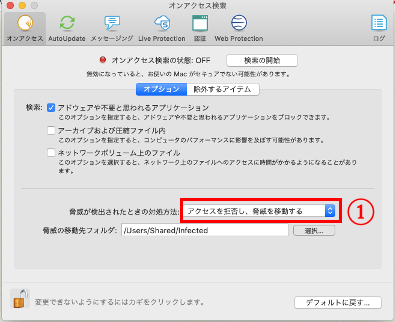
On-access search settings
1.Make sure the On Access tab at the top of the window is selected.
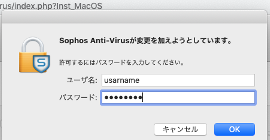
2.If the key mark at the bottom left is closed, click the key mark.
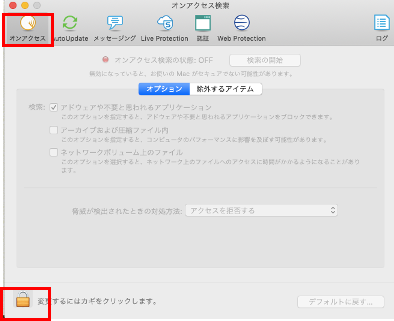
3.Enter the administrator account and password for that computer, and press [OK].
4.From the pull-down menu of "What to do when a threat is detected", select "Deny access and move the threat" ①.
Automatic update settings
1.Select the "Auto Updates" tab at the top of the window.
2.Select "In-house Web server" from the "Update source" pull-down menu ①.
3.Enter the URL of the update source in the address field ②.
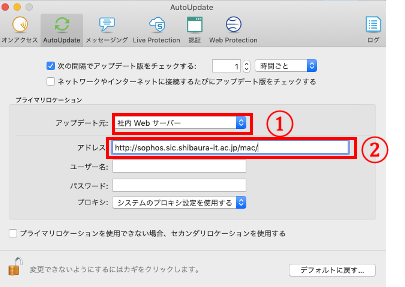
Please copy and paste the following character string into the above address field.
| http://sophos.sic.shibaura-it.ac.jp/mac/ |
4.If you want to use the system off-campus, set the following (skip if you do not use it off-campus).
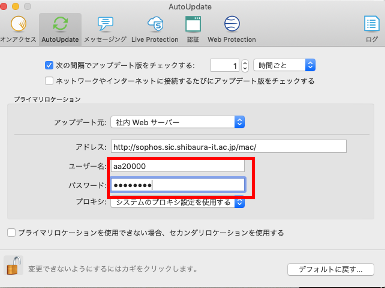
Username: Enter your academic ID.
Password: Enter the SAV update password set in advance on the AMI.
(Click here for how to set up with AMI)
Proxy: You do not need to use a proxy server on campus.
When using it off-campus, it depends on the network to be connected and the network settings of each system, so please set it appropriately according to your own usage environment.
Local volume search settings
1.Select "Sophos Anti-Virus" from the menu bar on the desktop screen and click [Open Search].
2.Click the [ + ] at the bottom left.
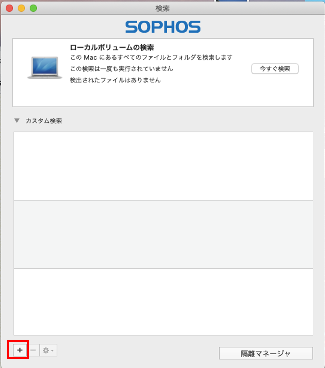
3.[Unnamed Scan] will be created, so rename it to [Scan Local Drives].

4."Sophos Endpoint" pop-up will appear, click [Open Security & Privacy].

5.Enter the username and password for that computer, respectively, and press [Install Helper].

6.Select "Security and Privacy"→ "Accessibility"→"Privacy" and click [+].
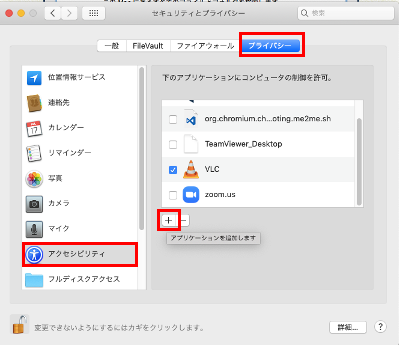
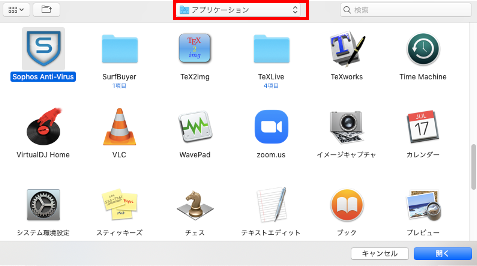
7.Select "Applications" from the selection field above and then select [Sopohos Anti-Virus].
8.Make sure Sophos Anti-Virus is added to "Privacy" and click the lower left key mark to save your changes.

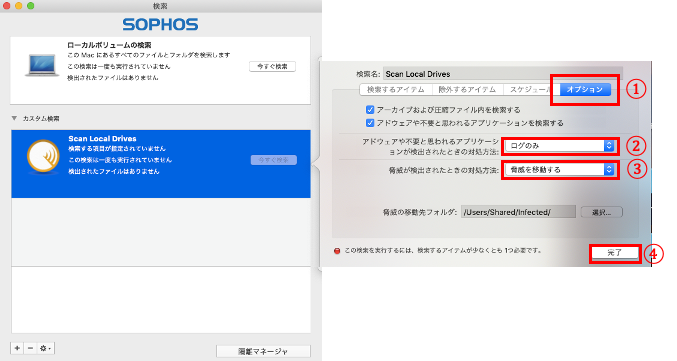
9.Return to "Search" screen
10.Click the "Options" ①.
11.Select [Logs Only] from the pull-down menu of "What to do if adware or applications that you think are unnecessary are detected" ②.
12.Select "Move threat" from the pull-down menu of "What to do when a threat is detected" ③.
13.Click [Finish] to close the setting screen ④.
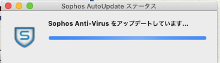
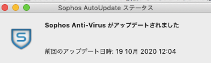
Perform manual update
1.Click "Sophos Anti-Virus" from the desktop menu bar and select [Update Now].
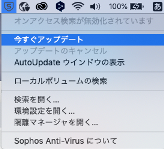
2.Wait for a while until the update is complete.
3.Close when "Updated" is displayed.
About automatic update
SAV that has completed the above-mentioned automatic update settings correctly will check the update server on campus every hour regardless of login / non-login, and will automatically update if necessary.
※The system must be connected to the network when updating the SAV.
※If the system is in sleep mode, no updates will be made.
| The default interval for automatic update of installed SAV is 1 hour, but please use it without changing the setting. If the update interval is too long, the response to the "latest threat" will be delayed, and if the interval is too short, update traffic will be concentrated on the "SAV distribution / update server", which may hinder the operation of the server. Since the update interval of the contents of the SAV distribution / update server is 1 hour (virus definition file) and 2 hours (program module), respectively, there is no merit to change the update interval on the client side to less than 1 hour. |