
ホーム > サービス > 授業支援 > ScombZ > 課題の出し方
How to submit an assignment
2020/11/11 更新
This function presents assignments to students and requires them to submit reports. You can set due dates, check the status of submissions, and provide feedback.
*The maximum size of report files that can be submitted by students is 50 MB per file.
| Target audience | Teachers |
| Objective | Students are presented with assignments on Scomb and asked to submit them |
Create New
A link to the assignment submission page will appear on the student's TOP screen after the submission period starts, which was set when the assignment was created. (If the submission start date is set to a date earlier than the current date, it may take up to one minute for the link to appear on the student's screen.)
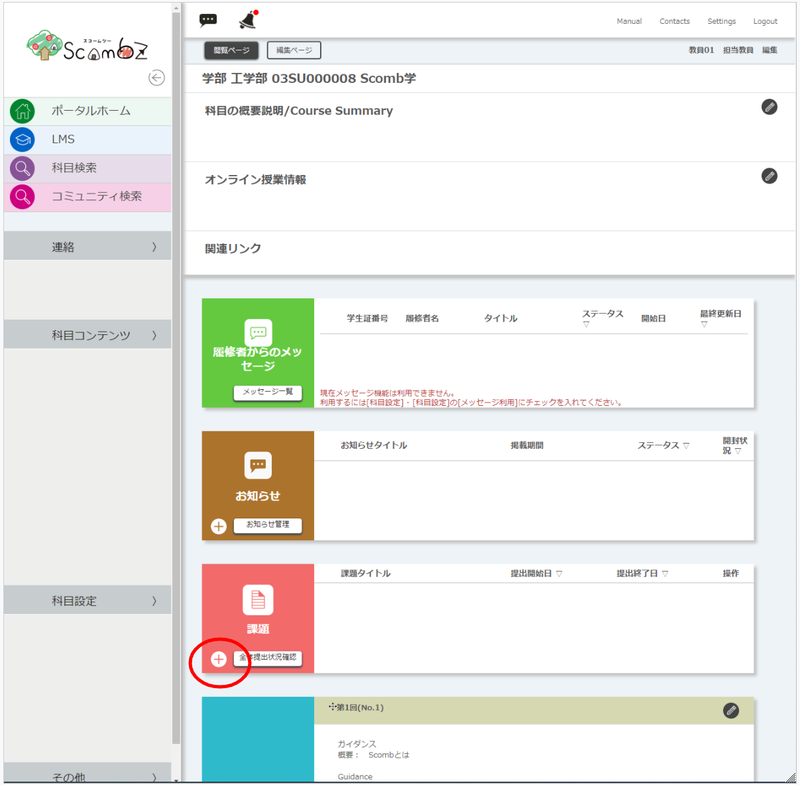
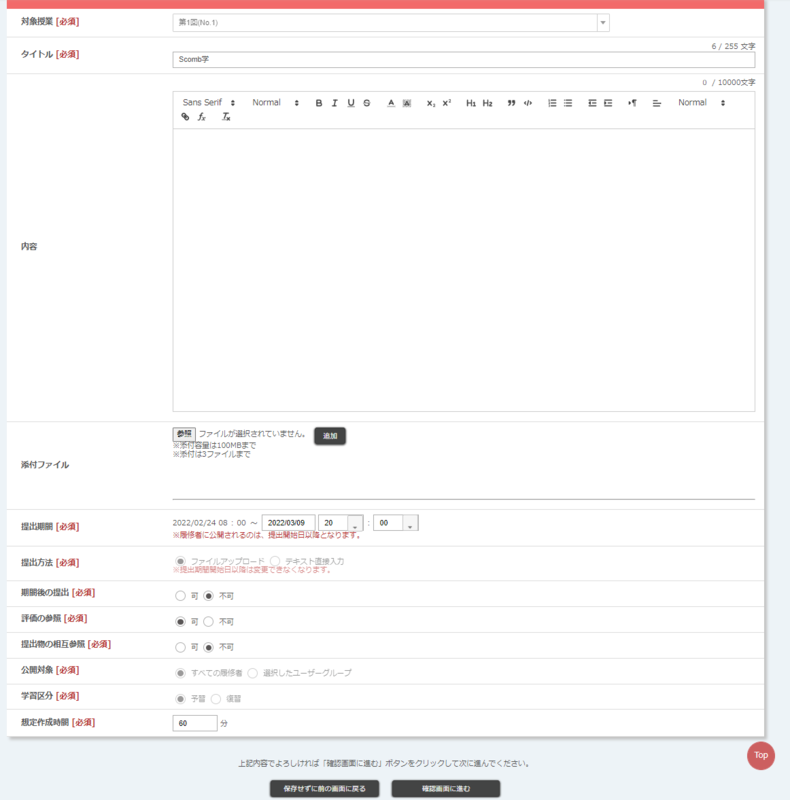
Clicking the "+" button for an assignment on the "Edit Course TOP" screen will open the "Create New Assignment" screen.
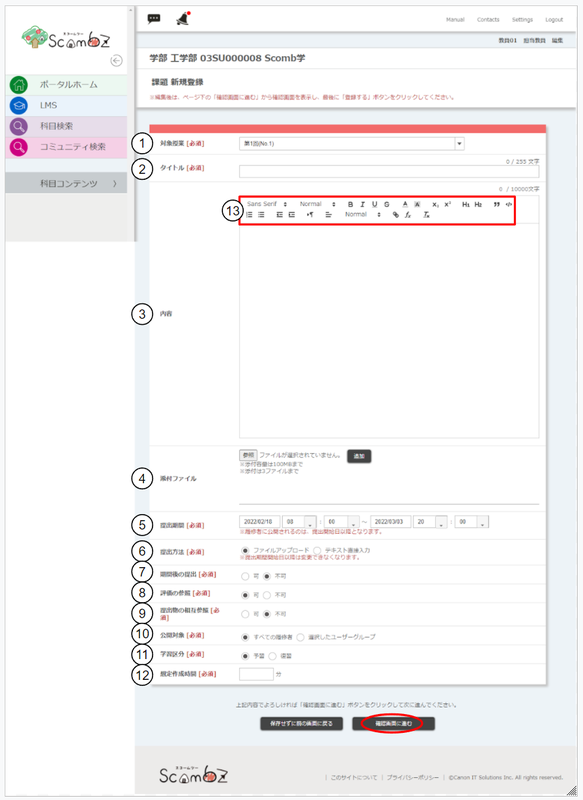
| ① | Subject Classes |
Select a class from the pull-down menu for which you wish to submit assignments. *For details on class registration, please refer to the "Course Content / Course Materials" section of this manual. |
||||||||||||
| ② | Title | Enter the title of the issue. (max. 255 characters) | ||||||||||||
| ③ | Contents | Enter a description of the issue. (10000 characters max.) | ||||||||||||
| ④ | Attachment |
You can upload files. (Attachment capacity is 100MB, up to 3 files) |
||||||||||||
| ⑤ | Presented during |
You can set the submission period. You can change it even after the submission period has started.
|
||||||||||||
| ⑥ | Presentation Method | Decide whether you want to upload files or enter text directly. | ||||||||||||
| ⑦ | Submission after the period | Decide whether or not to allow the report to be submitted after the submission period has passed. | ||||||||||||
| ⑧ | Rating Reference | Allows or disallows the student to refer to the evaluation of the report. | ||||||||||||
| ⑨ | Cross-referencing of submissions | Determines whether or not the submitted report will be made available for viewing by other public audiences. | ||||||||||||
| ➉ | Publication Subject |
Decide who you want to publish the issue to ("All Participants" or "Selected User Groups"). Selecting "Selected User Groups" will display a list of user groups. To use user groups, user groups must be created beforehand in "User Group Management". |
||||||||||||
| ⑪ | Study classification |
Select whether the time spent responding to the assignment will be credited to "Prep" or "Review". Submission |
||||||||||||
| ⑫ | Assumed creation time |
Enter the estimated time it will take to respond to the issue. |
||||||||||||
| ⑬ | Markup function |
Markup functions are available. |
After completing the required information, click the "Proceed to Confirmation Screen" button to display the "Confirm Registration Details" screen.
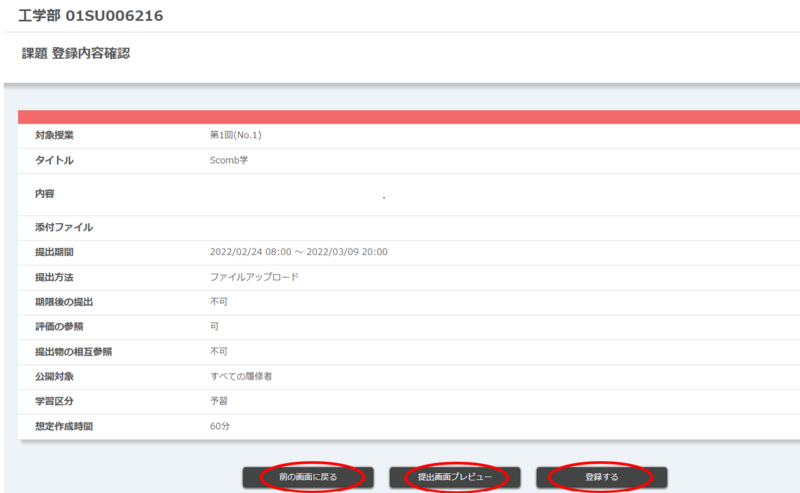
Click "Back to Previous Screen" to display the "Create New Proposal" screen again.
Click [Preview Submission Screen] to display the "Preview Submission Screen" screen.
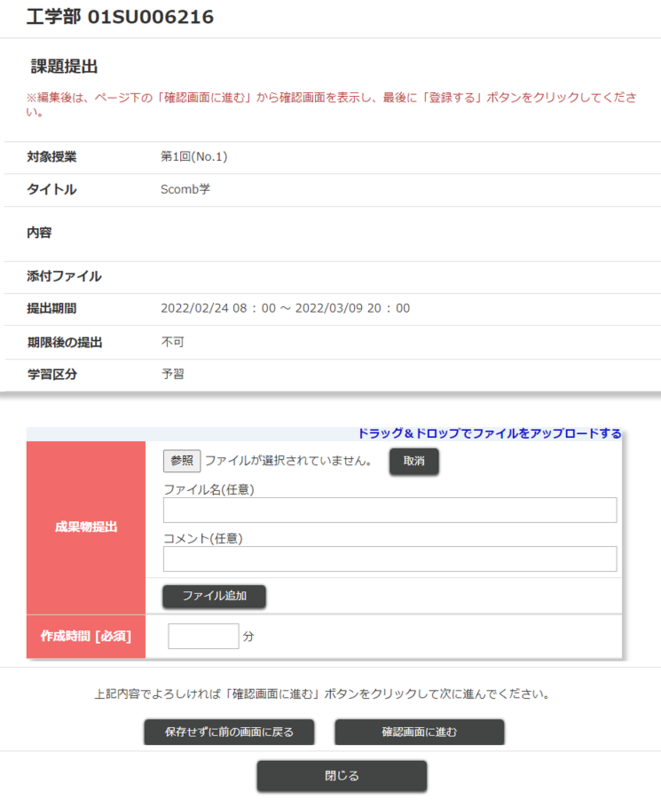
After reviewing the submission screen, click the "Proceed to Confirmation Screen" button to move to the "Confirm Registration Details" screen.
After confirming that the information is correct, click the "Register" button. Click the "Registration Completed" button. is displayed, the registration is complete.
*When the submission period arrives, the contents of the assignment will be displayed on the "Course TOP" screen of the students who have set the assignment as open to the public. The title of the assignment and NEW will be displayed for three days from the start of the submission period.
Issue Editing
Clicking on the "Issue Title" link of a previously created issue will display the "Edit Issue" screen.

After modifying the information, click the "Proceed to Confirmation Screen" button to move to the "Confirm Registration Details" screen.
After confirming that the information is correct, click the "Register" button.
Click the "Registration Completed" button. is displayed, the registration is complete.
Issue Deletion
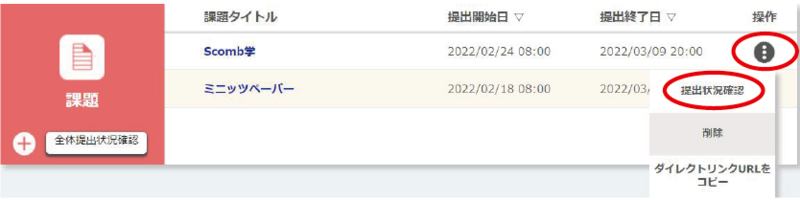
Click [︙] on the issue you wish to delete and you will see a [Check Submission Status] link, a [Delete] link, and a [Copy Direct URL] link.

After clicking the "Delete" button, a confirmation dialog box appears.
Clicking the "Delete" button in the confirmation dialog will delete the created assignment.
*Assignments that have already been submitted by a student cannot be deleted.
Assignment Submission Status Check
You can check the submission status of the assignments you have created.
On the "Edit Course TOP" screen, click on "Check Submission Information" from the operation panel of the issue you wish to check, and you will be redirected to the "Check Submission Status" screen.
The "Check Submission Status" screen allows you to check the list of students and submitted reports.
You can also batch download submitted files and submission status, and batch upload comments, evaluations, and feedback files.
Students can check their uploads immediately after uploading.
In addition, a reminder e-mail can be sent to those who have not yet submitted their reports.
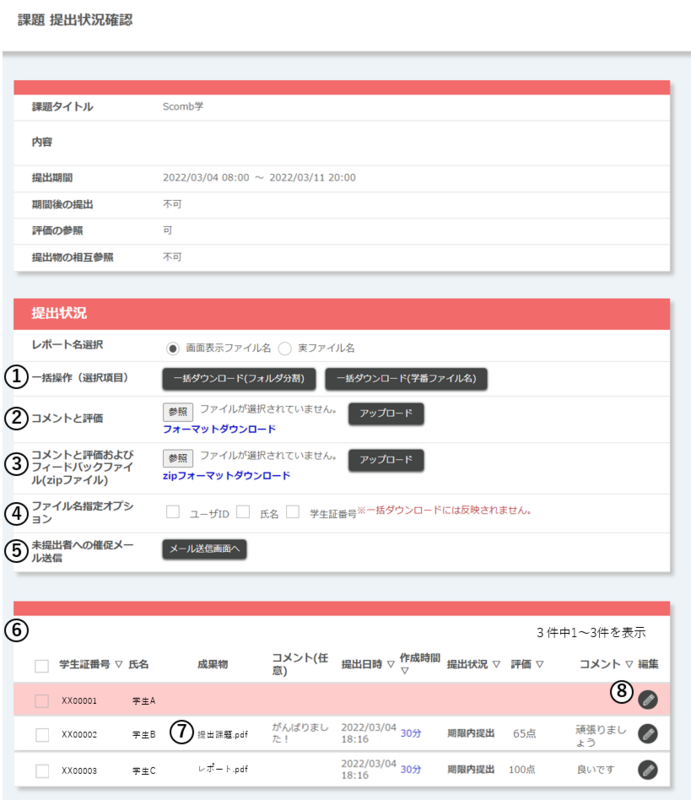
| ① Batch operation (item selection) |
You can download the submission information for the selected enrollments in a batch. *For details, please refer to "Batch Report Download" in this manual. *The download file does not include content registered by users whose provisional registration period has expired and who are not yet registered for courses. |
|
② Comments and Ratings |
Register comments to students in bulk. |
| ③ Comments and ratings and feedback file | Register comments, evaluations and feedback to students in bulk. |
| ④ filename option |
|
| ⑤ Sending e-mail reminders to those who have not submitted their documents |
You can send an email to those who have not submitted their assignments. |
| ⑥ Submission Status List | You can check the submission status of users who are eligible to submit reports. Users who have not submitted reports are displayed with a red background. |
| ⑦ Report |
Click on the "Reports" link of each student's submission to download the report. The title and time text color will vary depending on the submission status. a. If the "Creation Time" exceeds the expected creation time ⇒Time of creation is displayed in red text. b. If the "Creation Time" is less than half of the estimated creation time ⇒Time of preparation is displayed in blue. c. Submitted after the submission period ⇒The report title and submission date are displayed in red text. *For details on setting the estimated report creation time and submission period, please refer to the "Creating a New Assignment" section of this manual. *Users whose background color is gray are those whose provisional registration period has expired and who are not registered for courses. *Users who have not registered any content will not appear in the list, regardless of whether their |
| ⑧ Editing | Clicking the "Edit" link will take you to the "Feedback Comment Registration" screen. |
Batch download of reports
You can download the submission information for the selected enrollments in a batch.
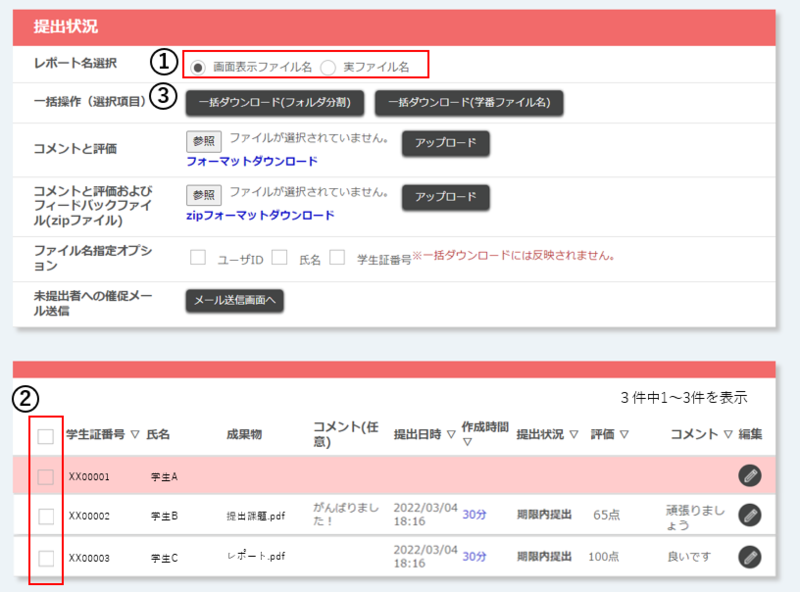
①Select whether the file name of the submission to be downloaded is an image display file name or an actual file name.
② Select the check box of the user you wish to download.
③ Click the [Batch Download] button to download the submission information of the selected user in a batch.
The downloaded file will be unzipped in zip format and will consist of the following.
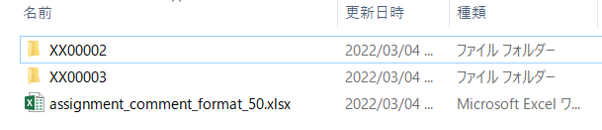
The user submitting the report will have a folder named [user ID], and the report will be stored in the folder.
The "assignment_comment_format.xlsx" contains the submission information for each student.
*Please refer to "Checking Report Submission Status" in this manual for the reports of provisionally registered users.
The "assignment_comment_format.xlsx" file

The status of each student's assignment submission and faculty evaluation and feedback information will be displayed.
Format download/upload
You can register comments and evaluations to students in a batch.
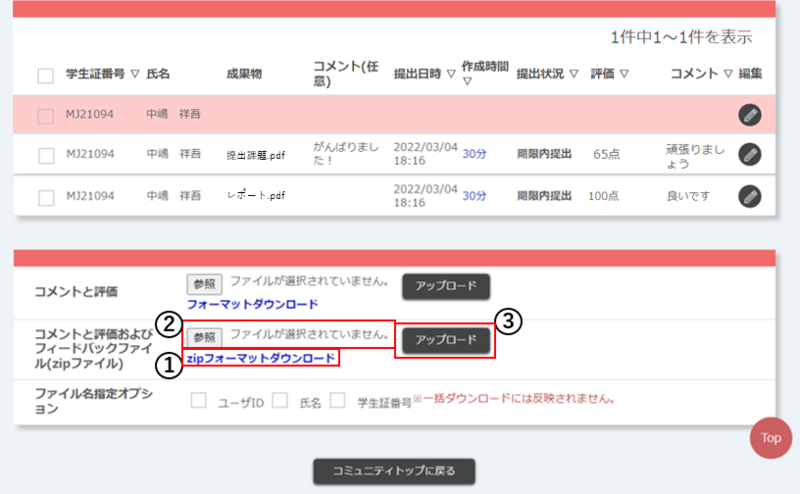
Download the format (.xlsx format) from the [Download Format] link.

| a.Evaluation | In addition to numerical values, a string of characters such as good acceptable can be entered as a rating. (up to 255 characters) |
| b.Comment | You can enter a comment of up to 1300 characters. |
| c.File-name |
If a feedback file has already been uploaded, the file name can be changed. *If the feedback file has not been registered, the file name cannot be changed. |
②Click on the "Browse" button to select the format you have filled out.
③Click the [Upload] button to upload the comments you have entered and the evaluation in a batch.
*Only students who are eligible for the course can view the evaluations and comments that have been registered.
*If there is an input error, please correct it and upload the file again until all the data in the uploaded file is reflected.
zip format download/upload
You can register comments and evaluations to students in a batch. Feedback files can also be registered at the same time.
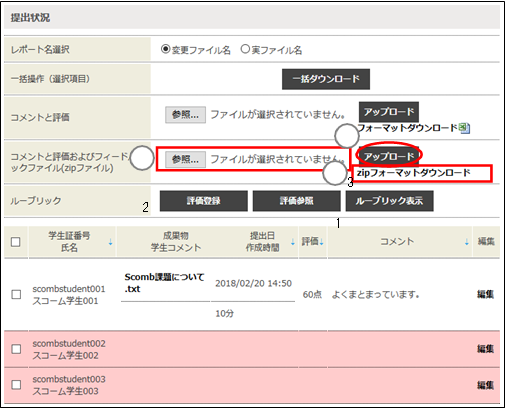
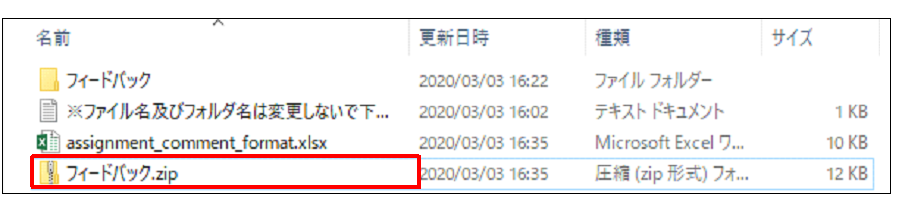
①Download the format from [Download zip format] and extract the zip file.
The "assignment_comment_and_feedback_format" folder in the red frame is the extracted folder.

<Contents of the "assignment_comment_and_feedback_format" folder >

In the "feedback" folder, store the file you wish to upload, and in "assignment_comment_format.xlsx" enter the evaluation, comment, and file name (file name of the file placed in the feedback folder).
Compress the created folder again into a zip with a red frame.

*If the folder in the red box extracted in (1) is compressed into a zip file, the file organization will be different and uploading will not be possible.
*For details on "assignment_comment_format.xlsx", please refer to "Format Download/Upload" in this manual.
Click the "Browse" button and select the zip file you just created.
*Upload the file without changing the file name of the downloaded format.
③Click the "Upload" button to upload all the comments, evaluations, and feedback files you have entered in a batch.
*Only the students who are eligible for the course can view the submitted evaluations and comments.
*If there is an input error, all data in the uploaded file will not be reflected.
*Please correct the data and upload the file again. If you wish to upload multiple files, please zip them into one file.
*If you still cannot upload the file after correcting the input errors, the file organization may be different.
Unzip the zip file to be uploaded and check that the file organization is as shown below. If the file organization is different, correct it and upload the file again.
<zip file to be uploaded>

<Contents of the file extracted from the above zip file>

<Contents of the "Feedback" file> (If you have files you wish to upload, please store them in this file.)

Register Feedback Comments
The "Feedback Comment Registration" screen allows each student to register his/her evaluation of the assignment, feedback comments, and feedback file. Students can check their registration details immediately after registration.
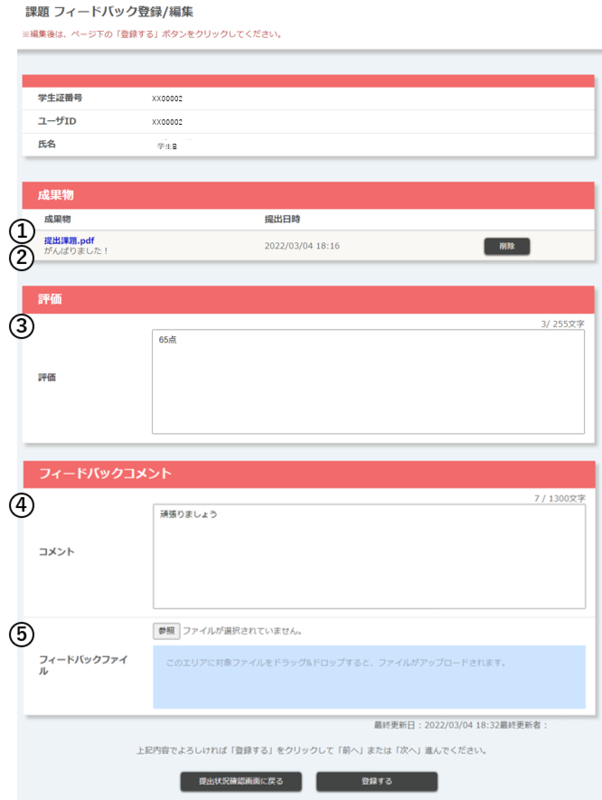
| ① Report | You can download reports submitted by students. |
|
② Student Comments |
Comments registered by the student at the time of submitting the deliverables will be displayed. |
| ③ Evaluation | You can rate the reports submitted by your students. (max. 255 characters) |
| ④ Comment | You can enter feedback comments. (max. 1300 characters) |
| ⑤ Feedback file | Feedback files can be uploaded. (max. 50MB per file) |